01. Introduction
There are many word processor programs available.
You will probably have a simple word processor such as Windows Write/Wordpad on your computer. Windows Write/Wordpad does not have many of the more advanced functions of a more complex program.
You might also have a more complex program such as Microsoft Word on your computer.
Note:
The instructions and screen dumps in this section are based on Microsoft Word, although most of the functions described can also be found in other complex word processors and many of the instructions will work for these programs as well. To be certain, however, you should check the program's help files.
02. Opening a file
The following instructions are based on Microsoft Word, but the procedure will be similar for other word processors as well.
- Launch your word processor.
- Select ‘File’ from the word processor’s menu bar.
- Select ‘Open’ from the drop-down menu.

- Navigate to the folder in which the file you want to open has been saved.
- Ensure that the ‘Files of type’ box is on ‘All Files’.
- Double-click on the file name you require.
03. Formatting text
To alter the format of the text in your document:
- From the 'View' menu, select 'Toolbars'.
- Left-click on 'Formatting'. The formatting toolbar will now be shown at the top of the Word window.

The formatting toolbar reflects the format of the text at the point where the cursor is positioned. When the screen shot was taken for the image above, the font of the selected text was Arial and it was set to 11 point in size.
- There are two ways to format text in a document:
a) Change the format and then type text in that format,
Or
b) Alter the format of text that you have already typed.To change the format of text as you type, simply perform the operations outlined below and any text typed after that point would be formatted as specified.
To change the format of already typed text, first place the cursor at the beginning of the text you wish to format, click down the left mouse button and then, still holding the button down, move the cursor to the end of the relevant text and release the button. The text will appear in white on a black background. Any of the operations outlined below will affect only the selected text (if the text selected is at the end of the document, then any more text added after this may also have the new format.)
Changing the font
- Using the left mouse button, click on the little triangle to the right of the second box from the left of the toolbar. (In the above screenshot, this is marked Arial, but the entry will depend on the font currently beneath the cursor.) This will cause a drop-down menu of different fonts to be displayed.
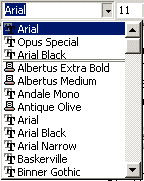
In later versions of Word (this is from Word 97) the format of the entries on the list will look like the font they refer to (so the word 'Arial' will be in Arial font, the word 'Albertus' in Albertus font etc.)
- To change font, use the scroll bar to move down the list until the font you want is displayed and then click on it.
Changing the text size
- The size of the text is indicated in the box to the right of the font box on the toolbar. In the above example, it is 11 point. To change this you can either type the point size you require into the box, or (as above) click on the triangle to the right of the point size and select from the drop-down menu.

- You should be aware that you are not restricted to the point sizes given on the drop-down menu. Most printers can cope with font sizes down to 4pt or less, and will accept any whole number above this (so the fact that there is not a number 13 on the list is not significant). Also, decimals can be entered, so 10.5 is a valid size. To use any sizes that are not on the list, simply type directly into the box.
Changing the text colour
- In order to alter the colour of the text as displayed, first decide which colour you want to have instead. The Font Color button is the button on the right hand side of the formatting toolbar.

The colour that will be selected is indicated on the button and also on the pop up that is displayed when you hover the cursor over the button. In this case, the text will be red.
- To change the colour that the text will be converted to, click on the little triangle to the right of the Font Color button. A drop-down palette will be diplayed of the colours available.
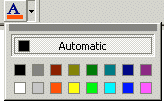
Click on the desired colour to select it. You will notice that the button changes to reflect this selection.
- If you find that you have made an error, repeat the process, selecting the large "Automatic" button. This will return the font to black.
Formatting text
Other text options that can be accessed from the Formatting toolbar are as follows:
 |  |
 |
| Make text bold | Make text italic | Underline text |
For each of these, the same procedure should be followed as outlined above. I.e click on the icon you choose then type the text, the text will be bold if you selected the bold icon, italic if you selected the italic icon etc. To change the format of already typed text, first place the cursor at the beginning of the text you wish to format, click down the left mouse button and then, still holding the button down, move the cursor to the end of the relevant text and release the button. The text will appear in white on a black background. Then click on the bold icon for bold text etc.
04. Highlighting text in colour
The following instructions are based on Microsoft Word, but the procedure will be similar for other word processors as well. To highlight text in colour you will need to make sure that the ‘Formatting’ toolbar is showing.
- Select 'View' from the menu bar.
- Select 'Toolbars' from the drop-down menu.
- Make sure that the 'Formatting' option is ticked.
Now you can highlight your text.
- Select the text that you want to highlight in colour.
- Click on the down arrow next to the highlight button on the 'Formatting' toolbar.

- Click on the colour that you want to use to highlight the text.
05. Using WordArt 1
The following instructions are for Microsoft Word only (some programs may have a similar feature, but you will need to check the help files to find out). To use WordArt, select ‘Insert’ from the menu bar, then select ‘Picture’ then ‘WordArt ...’ from the drop-down menu.
Select the WordArt style you want by double-clicking it (or clicking it once then clicking ‘OK’). The ‘Edit WordArt Text’ dialogue box will appear. Type in the text you want to use.
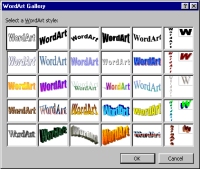
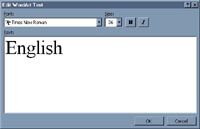
If you want to change the font, click the down arrow by the font box and select a different font. Click ‘OK’ and the text will appear in your document.
06. Using WordArt 2
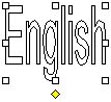
To move WordArt text to an appropriate position in your document, move the cursor over the word(s). When the cross appears hold down the mouse button and drag the WordArt text to a new position.
To stretch or change the size of your text, first click on the text. Small squares will appear around the WordArt text. Click and drag a square. This will elongate or widen the shape of the text.
07. Editing WordArt
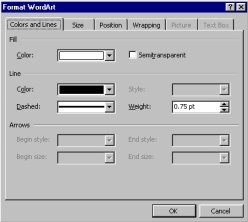
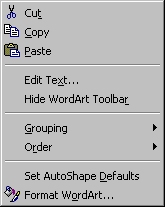
To edit the text, click on the word to be edited. Click on the text with the right mouse button and a menu will appear. The ‘Edit Text ...’ and ‘Format WordArt ...’ options enable you to change the text content, the colour, lines, texture, wrapping and size.
08. Using layout features 1
The following instructions are based on Microsoft Word. Other word processors may have similar features, but you will need to check their help files to find out.
Columns: You can use the ‘Columns’ feature to put your text in more than one column.
- Open your word-processed document.
- Select ‘Format’ from the menu bar.
- Select ‘Columns’ from the drop-down menu.
The ‘Columns’ window will now open. Experiment with the various options.
Style Gallery: You can use the ‘Style Gallery’ (sometimes called ‘Format Gallery’) feature to select a pre-set style for your text.
- Open your word-processed document.
- Select ‘Format’ from the menu bar.
- Select ‘Style Gallery’ from the drop-down menu.
The ‘Style Gallery’ window will now open. Experiment with the various options.
continued
09. Using layout features 2
Borders and Shading: You can use the ‘Borders and Shading’ feature to decorate your text.
- Open your word-processed document.
- Select ‘Format’ from the menu bar.
- Select ‘Borders and Shading’ from the drop-down menu.
The 'Borders and Shading' window will now open. Experiment with the various options.
continued
10. Using layout features 3
Text Boxes: You can use the ‘Text Box’ feature to make an interesting layout for your text.
- Open your word-processed document.
- Select some of your text.
- Select ‘Insert’ from the menu bar.
- Select ‘Text Box’ from the drop-down menu.
- Use the ‘handles’ on the outside of the text box to change its shape.
continued
11. Using layout features 4
Tables: You can use the ‘Tables’ feature to present your text in a table.
- Open your word-processed document.
- Select ‘Table’ from the menu bar.
- Select ‘Draw Table’ from the drop-down menu.
- Draw a box to contain your table.
- The ‘Tables and Borders’ toolbar will now open. Experiment with the various options.
You can use tables with or without borders to add graphical effects and manage the layout of a web page. You can organise columns of graphics and text so that they will be aligned together in web browsers. Without tables, it can be difficult to keep graphics and text aligned in HTML (the format for web pages).
continued
12. Using layout features 5
You can use the table drawing tool to help arrange text and graphics. If you don’t want the border to appear on the finished page, you can remove it by selecting ‘Format’ from the menu bar then ‘Borders and Shading’ from the drop-down menu and setting the border style to ‘None’. Even if the border is removed, gridlines may appear in your document to show the table boundaries. To control the display of gridlines, select ‘Table’ from the menu bar and then select ‘Hide Gridlines’ or ‘Display Gridlines’ from the drop-down menu. Gridlines do not appear on the page.
Most web browsers now support tables, but some early versions do not. If you are using Word to create a web page and you want people using old browsers to be able to view the content in the table, you may want to also structure your information in text-only format and then provide a hyperlink to the text-only version. Look at the information about saving in HTML format.
13. Columns
The following instructions are based on Microsoft Word. Most other word processors have similar features, but you will need to check their help files to find out how to use them.
It may be necessary to organise the layout of a leaflet or other publication using columns and/or text wraps. This allows you to position the text in a clear and easy-to-read format. Images can be imported independently or into text boxes. These can also have borders.
To create columns
- Select ‘Format’ from the menu bar.
- Select ‘Columns...’ from the drop-down menu.
- Choose the number of columns you want.
The width of the columns is set depending on the number that you choose. However, you can alter the width if you want different-sized columns by removing the tick from the ‘Equal column width’ box. - Click ‘OK’.
14. Wrapping
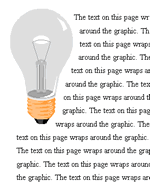
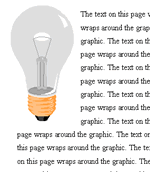
The following instructions are based on Microsoft Word. Other word processors have similar features, but you will need to check the help files to find out how to use them. You can choose how you want to wrap text around a graphic or text box. For example, you can place a graphic between columns of text and still keep the column format.
To wrap text and graphic or text and text box, double-click on the graphic or text box. The ‘Format’ dialogue box will appear. Click on the ‘Layout’ or ‘Wrapping’ tab and select the wrapping option you want to use.
Two examples of text wrapping
15. Printing
The following instructions are based on Microsoft Word. Other word processors have similar features, but you will need to check the help files to find out how to use them.
- Make sure that the computer has a printer attached
- Select ‘File’ from the menu bar.
- Select ‘Print’ from the drop-down menu.
- Follow the on-screen instructions.
Your file will now be printed.

16. Combining text & images 1
You can create graphics in a
graphics program, such as Paint, and then paste or insert them into a word processor. The graphics that you paste or insert could be photographs or drawings. You can also paste in text from other word-processed documents.
Some of the graphics and text you will use may have come from a variety of sources (e.g. CD-ROMs or the Internet). You may have created others yourself. Make sure you know the file names of everything you need to use.
continued
17. Combining text & images 2
Step-by-step instructions
The following instructions are based on Microsoft Word and Windows Paint. These instructions will also work with most graphics programs and most word processing programs.
- Open a word-processed document.
- Minimise the word-processed document by clicking in the ‘Minimise’ box in the top right corner of the screen.
- Open your graphics file.
- Select the part of the graphic you want to use by drawing a selection box around the area you want to use.
- Select ‘Edit’ from the menu bar, then ‘Copy’.
- Minimise Paint and maximise Word by clicking on the Word button on the Windows task bar.
- Put the cursor on the word-processed document at the point where you want to insert the graphic, and click.
- Select ‘Edit’ from the menu bar, then ‘Paste’. The graphic will appear in the place you have chosen.
18. Drawing using Word
Microsoft ® Word (or other Microsoft Office applications, such as Excel) include a drawing tool so that you can add a simple chart or drawing to your document without having to create it in another application.
The finished drawing is handled just like an image that was imported from another program - for example, you can resize it or change how the text flows around it.
These drawing tools are useful for making simple, small drawings, especially if you can assemble your drawing from the ready-made 'AutoShapes'. But if your drawing is likely to be large or complicated, it may be better to make it separately and then insert the finished image into your word-processed document.
The drawing toolbar can be found by selecting the 'View' menu, choosing 'Toolbars', then selecting 'Drawing' option. You can make simple diagrams by combining ready-made shapes from the AutoShapes menu of the drawing toolbar with other elements. These might be text, clip art, or imported graphics. Tools to add an organisation chart or a graph are also available.
19. Adding images
Most word processors will allow you to insert a graphic into your text. The instructions below may vary from system to system. The following instructions are based on Microsoft Word, but the procedure will be similar for other word processors as well.
- Position the cursor at the place you want to insert the graphic, and click.
- Select ‘Insert’ from the menu bar.
- Select ‘Picture’ from the drop-down menu, then ‘From File...’.
- Click in the ‘Look in’ box and select the drive in which the image you want to use has been saved (e.g. your CD-ROM drive).
- Double-click on the folder containing the image file.
- Make sure that the ‘Files of type’ box is on ‘All Files’ or ‘All Pictures’.
- Double-click on the file that you require.
The graphic will be inserted where you clicked. Some word processors allow you to alter the properties of the picture and the way the text flows around it – look at the program’s help files to find out how to do this.
20. Cropping images
- When you click on an image that has been inserted into a Word document, the Picture toolbar should automatically appear. If not, it can be selected from the 'View / Toolbars' menu.

- Now select the "crop" tool by clicking on the
 button.
- Place the crop pointer over any of the sizing handles and by clicking and dragging with the mouse you will be able to crop the image to include only that part you want. (You will be moving the borders of the picture to 'close in' on the desired image.)
- If you want to copy or move the cropped image, you can click on it and drag as usual. However, this is still a cropped version of the full picture. If you select the crop tool once again and drag the sizing handles of the copied image, you are able to get the rest of the picture back.
21. Spellchecker 1
The following instructions are based on Microsoft Word. Other word processors have similar features, but you will need to check the help files to find out how to use them.
- Open your word-processed document.
- Select ‘Tools’ from the menu bar.
- Select ‘Spelling and Grammar’ from the drop-down menu. Your document will now be checked for spelling and grammar. (You must ensure that the ‘Check grammar’ box has been ticked in order for the spellchecker to check the grammar for you.)
continued
22. Spellchecker 2
| 4. | If the spellchecker finds a spelling error in your text, a window will appear.
The ‘Not in Dictionary’ box shows a segment of your text with the error highlighted in red.
The ‘Suggestions’ box shows the spellchecker's suggestions for correcting the error.
There are various option buttons, including:
|
| | Ignore: | This will ignore the word highlighted in the ‘Not in Dictionary’ box and move on to the next error. |
| | Add: | This will add the word highlighted in the ‘Not in Dictionary’ box to the dictionary. |
| | Change: | This will change the word highlighted in the ‘Not in Dictionary’ box to the word highlighted in the ‘Suggestions’ box. |
continued
23. Spellchecker 3
| 5. | If the grammar checker finds a grammatical error in your text, a window will appear.
The top box shows a segment of your text with the error highlighted in green. The type of error is shown above this box.
The ‘Suggestions’ box shows the grammar checker’s suggestions for correcting the grammatical error.
There are various option buttons, including:
|
| | Ignore: | This will ignore the current error and move on to the next. |
| | Change: | This will change the highlighted word or phrase in the top box to the word or phrase that is highlighted in the ‘Suggestions’ box. |
| 6. | You should select one of the various options for each error shown in your document. |
24. Word count
The following instructions are based on Microsoft Word. Other word processors have similar features, but you will need to check the help files to find out how to use them.
- Open your word-processed document.
- Select ‘Tools’ from the menu bar.
- Select ‘Word Count’ from the drop-down menu.
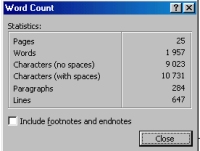
The Word Count will tell you how many pages, words, characters (with and without spaces), paragraphs and lines you have in your document.
25. Readability test
The following instructions are for Microsoft Word only (some programs may have a similar feature, but you will need to check the help files to find out).
When Microsoft Word finishes running a spellcheck, it can be set to show the results of a readability test. To do this:
- Select ‘Tools’ from the menu bar.
- Select ‘Options’ from the drop-down menu.
- Click on the ‘Spelling and Grammar’ tab.
- Ensure that the ‘Check grammar with spelling’ box is checked.
- Ensure that the ‘Show readability statistics’ box is checked.
- Click ‘OK’.
To run a readability test:
- Select ‘Tools’ from the menu bar.
- Select ‘Spelling and Grammar’ from the drop-down menu. The results will appear at the end of the spelling and grammar check.
26. Using comments
A useful feature in Microsoft Word is the ability to add "comments" to a piece of text. These comments are not visible within the document, but appear in a pop-up window when the mouse hovers over text that has been commented on. Particularly handy is the fact that a number of people can add comments to the same text, with each comment being marked with the identity of the person who made it. ( Your identity can be changed in the 'User Information' section, accessed by selecting 'Options' from the 'Tools' menu.)
Inserting a comment
To add a comment to a piece of text:
- Position the mouse pointer at the start of the word or phrase that is being commented on. Press the left mouse button and keeping it down, move the pointer to the end of the text being commented on. Release the mouse button. This text is now highlighted in black.
- From the 'Insert' menu, select 'Comment'. The selected text is highlighted in yellow with the initials of the user, (these are from the details in the User Information section), and a number identifying the comment. A text entry window is displayed in the lower half of the document window.
- Type your comment next to the comment number in this window. You can define a basic format for the text you enter by right-clicking next to the comment number and selecting 'Font', 'Paragraph', or 'Bullets and Numbering' from the drop-down menu. When you have completed the comment, click on the 'Close' button to return to the document.
(Note: Only bullets and numbering formats will be displayed in the pop-up.)
Displaying Comments
| 4. | When the cursor is moved over the commented text, the comment appears in a pale yellow pop-up. Notice that it is prefixed by the full name defined in User Information. To see the comment as it was entered, right-click on the commented text and select 'Edit Comment'. This will bring the text entry window back up. |
Editing Comments| 5. | To edit a comment, place the cursor over the commented text and right-click. Selecting 'Edit Comment' will return you to the text entry window to edit the comment. |
| 6. | When the comment has been amended to your satisfaction, click on the 'Close' button to return to the document. |
Deleting Comments| 7. | To delete a comment, place the cursor over the commented text, right-click and select 'Delete Comment'. |
Comments from several users
| 8. | If a number of users have entered comments on a particular piece of text, only the latest will be displayed in the document window. However, all will be visible in the Text entry window when 'All Reviewers' is selected in the 'Comments from' box. To see only the comments from a particular person, select their name from the drop-down list. |
27. Track changes
When the Track Changes feature is turned on, all changes made to a document - text inserted, text deleted, and formatting changes - are shown, with both the original and the amended text visible in different formats. These changes can then be altered and each change can be accepted or rejected.
In order to see all the amendments you are making to a file:
- Select 'Track Changes' from the 'Tools' menu.
- Select 'Highlight Changes'.
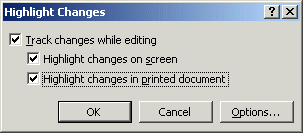
- In the 'Highlight Changes' dialog box which then appears, ensure that the 'Highlight changes while editing', and 'Highlight changes on screen' boxes are both ticked, in order to see the changes on screen. To also see the changes when the document is printed off ensure that the 'Highlight changes in printed document' box is ticked.
- Clicking on the 'Options' box will allow you to alter the display, using different colours/fonts etc for different kinds of changes. Note In order to see the amendments made by another person, they must have had the Track Changes feature switched on when they were changing the document.
- Once you have made all your selections click OK, this will close the dialog box and return you to your document.
- Now type in any changes you wish to make, all your changes will be shown in a different format.
- If you right mouse click on a change you have made, a dialog box pops up giving you the options of 'Accept Change', clicking on this means that the change selected will become part of the document. 'Reject Change', clicking on this means that the change selected will not become part of the document. 'Track Changes', clicking on this allows you to turn the 'Track Changes' feature on and off without going through the 'Tools', 'Track changes', 'Highlight Changes' menu selection. 'Accept or Reject Changes', clicking on this brings up the dialog box below and allows you to accept or reject all the changes in a document at once (using 'Accept All' or 'Reject All'). It also allows you to find all changes in the document and accept them or reject them individually (using the find options then Accept or Reject).
- The 'Accept or Reject Changes' dialog box can also be opened by selecting 'Tools'\ from the menu then clicking on 'Track Changes', 'Accept or Reject Changes'.

28. Inserting a hypertext link
A hypertext link is a section of text within a program that either links to another screen or document or causes a smaller window to pop up in front of the screen or document you are looking at. They are also sometimes known as hyperlinks.
The following instructions are based on Microsoft Word. For other word processors, check the help files.
- Save the documents that you are linking together in the same folder or on the same floppy disk.
- Open the first document.
- Select the text you want to make into a hypertext link.
- Select ‘Insert’ from the menu bar then ‘Hyperlink...’.
- Click the top ‘Browse...’ button and select a file.
- Click on ‘OK’, then on ‘OK’ again.
The text you selected will now be a link (usually indicated by blue, underlined type). If you hold the mouse pointer over this link the name of the linked file will appear in a pop-up box. Clicking this text will take you to the linked file.
29. Creating Internet links
The following instructions are based on Microsoft Word. For other word processors, check the help files.
- Open a word-processed document.
- Select ‘Insert’ from the menu bar and then select ‘Hyperlink...’ from the drop-down menu.
- Type the URL (website address) into the top box (e.g. www.bbc.co.uk).

- Click ‘OK’.
The URL will appear, highlighted, in your document and, if you are connected to the Internet, clicking it will take you to that website.
30. Saving in HTML format 1
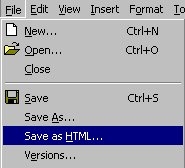
‘Save as HTML’ is becoming a common feature of many programs. It is available on some versions of Microsoft Word. It allows you to make web pages easily and quickly.
To save a document as an HTML file in Microsoft Word 97:
- Create a document (which
can include pictures and sound).
- Save your work.
- Select ‘File’ from the menu
bar and then select ‘Save
as HTML’ (a different Word
version might say ‘Save as
Web Page’). Word will now
convert the file for you.
You will now be able to open your document in a web browser and also upload it to the web.
|
 |
continued
31. Saving in HTML format 2
To open the web toolbar in Microsoft Word:
- Select ‘View’ from the menu bar.
- Select ‘Toolbars’ from the drop-down menu.
- Ensure that the ‘Web’ option is selected.
The web toolbar allows Word to be used as a web browser.

32. Tips 1
- The basic rule of word processing is: keep it simple.
- Text should always be saved in word-processed format as this uses less memory. The text can then be presented in many different ways. You might want to transfer the text into another program to present your information.
- Use the default font, usually Times New Roman or Arial, if you are going to use your text in other programs or on other computers.
- Add bold, italic and other effects only after you have completed the document. If you change as you go you will only find you have to keep on changing back again.
- Write all your text aligned left (not centred or justified). This makes it easier to import the text into a variety of other programs.
continued
33. Tips 2
| 6. | It is always a good idea to run a spellchecker when you have finished typing. |
| 7. | Text files (.txt) can be created and opened in most word processors including Write, Wordpad or Word on Windows, or using an Apple Macintosh. |
| 8. | Most word processors also allow you to convert a document to HTML if you want to publish it on the Internet or read it in a web browser. |






![]()
